Notifications در اندروید
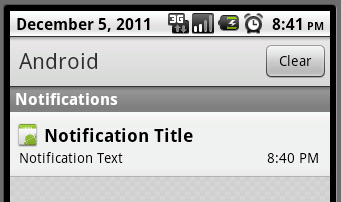
نوتیفکشن مکانیزمی است که می تواند در خارج از اپلیکیشن، پیامی را به کاربر نشان دهد این پیام ممکن است در مورد یادآوری Alarm ، بروزرسانی و بطور کلی در ارتباط با وقایع درونی مرتبط با اپلیکیشن باشد . زمانی که نوتیفکشن اپلیکیشن در سیستم بروز پیدا می کند ابتدا آیکنی در پایین صفحه ظاهر می شود که کاربر با لمس آن جزئیات کامل نوتیفکشن در قالب صفحه ای برای او ظاهر می شود. برای ایجاد یک نوتیفکشن راه آسانی خواهید داشت با دنبال کردن گام زیر خواهید توانست که برای اپلیکیشن خود نوتیفکشنی درخور شایسته خودتان بسازید.
گام اول : ایجاد Notifiaction Buillder
در قدم اول شما می باید با نوشتن دستور.()NotificationCompat.Builder.build نوتیفیکشن خود را بسازید چرا که بعد از ایجاد یک نوتیفکشن شما قادر خواهید بود به ویژگی هایی همچون آیکن ، عنوان و … دسترسی پیدا کنید.
NotificationCompat.Builder mBuilder = new NotificationCompat.Builder(this)
گام دوم : افزودن تنظیمات مربوط به نوتیفکشن
بعد از اینکه شما با فراخوانی کلاس نوتیفکشن ، آبجکت مورد نظر خود را ایجاد کردید خواهید توانست به مجموعه ای از ویژگی های ملحوظ شده به این آبجکت دسترسی پیدا کنید. لازم است که بدانید حداقل الزاماتی که یرای ساخت یک یک نوتیفکشن رعایت کنید عبارت است از :
ایجاد یک آیکن کوچک که با متد()SetSmallIcon فراخوانی می شود.
ایجاد یک عنوان که با متد()SetContentTitle فراخوانی می شود.
ایجاد جزئیات متنی که با متد()SetContentText فراخوانی می شود.
mBuilder.setSmallIcon(R.drawable.notification_icon);
mBuilder.setContentTitle(“your title order onclick “);
mBuilder.setContentText(“your text and message example : message of developer”);
البته شما آپشن های بسیاری برای لحاظ کردن ویژگی های نوتیفکشن در اختیار دارید. که پیشنهاد می شود برای مطالعه بیشتر آن ها به جستجوی
گام سوم:اضافه کردن عملیات یا اکشن به نوتیفکشن
قسمتی از آپشن مورد نیاز شما برای خلق یک نوتیفکشن ، اضافه کردن عملیات یا اکشنی است که اجازه می دهد کاربران بطور مستقیم به اکتیویتی مورد نظر شما دسترسی پیدا کنند. چرا که با ارجاع کاربران به آن اکتیویتی می توان یک یا چندین رویداد را به کاربر نشان داد. اصل این عمل بوسیله pendingIntent که دربرگیرنده Intent اکتیویتی مورد نظر شما است و امکان شروع آن اکتیویتی را برای کاربر فراهم می سازد.در این حالت کاربر با کلیک یا لمس نوتیفکشن ظاهر شده در پایین صفحه به اکتیویتی مورد نظر شما ارجاع داده خواهد حتی اگر اپلیکیشن شما در حالت run نباشد. این بدان معنی است که pendingIntent با ایجاد تنظیمات مورد نظر شما در سرویس سیستم امکان فراخوانی آن را مطابق با شریط و تنظیمات شما اعمال می کند.
Intent resultIntent = new Intent(this, yourActivity.class);
TaskStackBuilder stackBuilder = TaskStackBuilder.create(this);
stackBuilder.addParentStack(yourActivity.class);

stackBuilder.addNextIntent(resultIntent);
PendingIntent resultPendingIntent = stackBuilder.getPendingIntent(0,PendingIntent.
FLAG_UPDATE_CURRENT);
mBuilder.setContentIntent(resultPendingIntent);
گام چهارم:
نهایتاً این که شما آبجکت نوتیفکشن را بوسیله () NotificationManager.notifyبه سیستم پاس می دهید تا نوتیفکشن را برای شما ارسال کند.
NotificationManager mNotificationManager = (NotificationManager)
getSystemService(Context.NOTIFICATION_SERVICE);
mNotificationManager.notify(notificationID, mBuilder.build())
در ذیل به منظور درک توضیحات فوق مثالی برای کاربران عزیز ارائه می شود:
پروژه جدیدی را در اندروید استودیو یا اکلیپس ایجاد کنید
اکلیپس :File ⇒ New Android ⇒ Application Project
اندروید استودیو :File ⇒ New ⇒ New Project
بعد از تعیین مشخصات(نامگذاری) ، تعیین حداقل sdk و نوع اکتیویتی (blank یا Empty) ، نام اکتیویتی ابتدایی و اصلی خود را MainActivity بگذارید.
کلاس جدیدی را از پکیج اصلی به پروژه اضافه کنید و نام آن را NotificationView بگذارید.(برای این کار روی پکیج اصلی راست کلیک کرده و از منوی new گزینه java را انتخاب کنید و در پنجره ظاهر شده نام آن را NotificationView را بر آن بگذارید).
به دنبال ایجاد کلاس جدید NotificationView، از مسیر res ⇒ layout لایوت جدیدی را ایجاد کرده و نام آن را notification_Activity بگذارید. البته در کنار لایوت ایجاد شده لایوت دیگری به نام activity_main وجود دارد که لایوت اکتیویتی اصلی یا همان MainActivity است.
در مسیر res ⇒ layout لایوت activity_main را باز کرده و کدهای Xml آن را بدین صورت می نویسیم:
<RelativeLayout xmlns:android="http://schemas.android.com/apk/res/android"
    xmlns:tools="http://schemas.android.com/tools"
    android:layout_width="match_parent"
    android:layout_height="match_parent"
    android:paddingBottom="@dimen/activity_vertical_margin"
    android:paddingLeft="@dimen/activity_horizontal_margin"
    android:paddingRight="@dimen/activity_horizontal_margin"
    android:paddingTop="@dimen/activity_vertical_margin"
    tools:context="MainActivity">

    <TextView
        android:id="@+id/textView1"
        android:layout_width="wrap_content"
        android:layout_height="wrap_content"
        android:text="Click in button , create you Notificiation"
        android:layout_alignParentTop="true"
        android:layout_centerHorizontal="true"
        android:textSize="30dp" />


    <Button
        android:layout_width="wrap_content"
        android:layout_height="wrap_content"
        android:text="Notification"
        android:id="@+id/button"
        android:layout_alignParentBottom="true"
        android:layout_centerHorizontal="true"
        android:layout_marginBottom="127dp" />

</RelativeLayout>
بعد از افزودن کدهای لایوت اکتیوتی اصلی یا همان activity_main به سراغ کدهای جاوای کلاس MainActivity می رویم:
   import android.app.Activity;
        import android.app.NotificationManager;
        import android.app.PendingIntent;
        import android.content.Context;
        import android.content.Intent;
        import android.support.v4.app.NotificationCompat;
        import android.os.Bundle;
        import android.view.View;
        import android.widget.Button;

        public class MainActivity extends Activity {
            Button  runbtn;
            @Override
            protected void onCreate(Bundle savedInstanceState) {
                super.onCreate(savedInstanceState);
                setContentView(R.layout.activity_main);

                runbtn = (Button)findViewById(R.id.button);
                runbtn.setOnClickListener(new View.OnClickListener() {
                    @Override
                    public void onClick(View v) {
                        RunNotification();
                    }
                });
            }

            private void RunNotification() {
                NotificationCompat.Builder mBuilder = (NotificationCompat.Builder)
 new NotificationCompat.Builder(this)
                        .setSmallIcon(R.drawable.icon) // notification icon
                        .setContentTitle("message of you") // title for notification
                        .setContentText("of cdeveloper") // message for notification
                        .setAutoCancel(true); // clear notification after click
          Intent intent123 = new Intent(this, NotificationView.class);
          PendingIntent pi = PendingIntent.getActivity(this, 0, intent123,
Intent.FLAG_ACTIVITY_NEW_TASK);
         mBuilder.setContentIntent(pi);
         NotificationManager mNotificationManager =
        (NotificationManager) this.getSystemService(Context.NOTIFICATION_SERVICE);
                mNotificationManager.notify(0, mBuilder.build());
            }
        }
بعد از افزودن کدهای فوق به سراغ لایوت notification.xml می رویم و کدهای زیر را به آن اضافه می کنیم.
<?xml version="1.0" encoding="utf-8"?>
<LinearLayout xmlns:android="http://schemas.android.com/apk/res/android"
    android:orientation="vertical"
    android:layout_width="fill_parent"
    android:layout_height="fill_parent" >

    <TextView
        android:layout_width="fill_parent"
        android:layout_height="400dp"
        android:text="hello my friend, is activity show message " />
</LinearLayout>
بعد افزودن کدهای فوق ، مستقیماً به سراغ کلاس متناظر لایوت notification.xml یعنی کلاس Notification می رویم و کدهای زیر را به شکل زیر به آن می افزاییم.
import android.app.Activity;
import android.os.Bundle;


/**
 * Created by hamed on 06/07/2017.
 */
public class NotificationView extends Activity{


    @Override
    protected void onCreate(Bundle saveInstance){
        super.onCreate(saveInstance);
        setContentView(R.layout.notification);


    }

}
و در نهایت به سراغ AndroiManifest.xml رفته و کدهای زیر را داخل تگ<apication </apication> به شکل زیر اضافه می کنیم :
  <application
        android:allowBackup="true"
        android:icon="@mipmap/ic_launcher"
        android:label="@string/app_name"
        android:supportsRtl="true"
        android:theme="@style/AppTheme">
        <activity
            android:name=".MainActivity"
            android:label="@string/app_name"
            android:theme="@style/AppTheme.NoActionBar">
            <intent-filter>
                <action android:name="android.intent.action.MAIN" />

                <category android:name="android.intent.category.LAUNCHER" />
            </intent-filter>
        </activity>
        <activity android:name=".NotificationView">

        </activity>
    </application>
کپی برداری از محتوای سایت psrd، ممنوع بوده و پیگرد قانونی دارد. (تنها استفاده شخصی کاربران ، مجاز است) (کپی برداری توسط سایر وب سایت ها غیرقانونی بوده و در صورت رویت به ستادسازماندهی اطلاع داده خواهد شد.
0 دیدگاه