BottomNavigationView در اندروید
حتماْ تا حالا نوار استانداردی را که در برنامه ها بصورت ناوبری در صفحه پایین با چند آیتم مشخص قرار گرفته است را دیده اید این نوار که براساس متریال دیزاین اندروید طراحی و پیاده سازی شده است BottomNavigationViewاست که به نسخه 25 Library Library Support اضافه شده و عموماْ برای استفاده در دستگاه های تلفن همراه طراحی شده است که به کاربران امکان می دهد بین صفحات به راحتی مبادله کنندمحتویات Navigation View را می توان با مشخص کردن یک فایل منویی در Resource و در زیر پوشه دایرکتوی menu مشخص کرد بطوری که در آن علاوه بر فهرست هر آیتم ، آیکون و حالت فعال برای نمایش آیتم ها را می توان مشخص کرد. آیتم های منو را نیز می توان برای انجام عملیات ها یا مهاجرت به سایر اکتیویتی مورد استفاده قرار داد و لیکن باید توجه داشت که از BottomNavigationView باید زمانی استفاده شود که برنامه حداقل دارای سه تا پنج مقصد باشد .
بحث در مورد اینکه آیا زبانه ها باید در بالای صفحه یا پایین یک صفحه قرار بگیرند تقریبا یک دهه مسکوت مانده است. در این بین آندروید همیشه ترجیح داده است که از برگه ها به عنوان یک مکانیزم فیلتر کردن در بالای صفحه استفاده کند، در حالی که iOS از عنوان های اصلی ناوبری استفاده کرده است. در حال حاضر، با افزودن پایین Navigation View در کتابخانه ، توسعه دهندگان اندروید می توانند انتخاب کنند که کدام ناوبری اصلی از آنها در برنامه های خود می آید.
شروع برنامه نویسی
برای شروع جدید در BottomNavigationView ما می خواهیم اطمینان حاصل کنیم که برنامه Android ما با یک برنامه AppCompat به روز شده و به آخرین کتابخانه های پشتیبانی ارتقا یافته است. با این کار، می توانیم بسته Xamarin.Android.Support.Design NuGet (نسخه فعلی 25.3.1) را به پروژه Android خودمان اضافه کنیم
برای شروع باید وابستگی پروژه را به روز کنیم
compile 'com.android.support:design:25.3.1'
طرح بندی BottomNavigationView به شکل زیر می باشد:
<android.support.design.widget.BottomNavigationView
    android:id="@+id/bottom_navigation2"
    android:layout_width="fill_parent"
    android:layout_height="wrap_content"
    android:layout_alignParentBottom="true"
    android:background="@android:drawable/spinner_background"
    app:menu="@menu/item_to_menu_file.xml" />
اگر در داخل برنامه اکلیپس یا اندروید استودیو قرار دارید پروژه جدیدی را ایجاد کنید
اکلیپس :File ⇒ New Android ⇒ Application Project
اندروید استودیو :File ⇒ New ⇒ New Project
اما اگر هنوز برنامه خود را باز نکرده اید یکی از برنامه های فوق را باز نموده و بعد از تعیین مشخصات(نامگذاری) ، تعیین حداقل sdk و نوع اکتیویتی (blank یا Empty) ، نام اکتیویتی ابتدایی و اصلی خود را همان MainActivity قرار دهید. بعد از لود کامل برنامه ، در مسیر res ⇒layout لایه متناظر اکتیوتی اصلی یعنی activity_main را پیدا نمود و کدهای مندرج و پیش فرض آن را پاک کرده و کدهای xml زیر را به آن اضافه کنید:
<?xml version="1.0" encoding="utf-8"?>
<android.support.design.widget.CoordinatorLayout xmlns:android="http://schemas.android.com/apk/res/android"
    xmlns:app="http://schemas.android.com/apk/res-auto"
    xmlns:tools="http://schemas.android.com/tools"
    android:layout_width="match_parent"
    android:layout_height="match_parent"
    tools:context="MainActivity">

    <android.support.design.widget.AppBarLayout
        android:layout_width="match_parent"
        android:layout_height="wrap_content"
        android:theme="@style/AppTheme.AppBarOverlay">

        <android.support.v7.widget.Toolbar
            android:id="@+id/toolbar"
            android:layout_width="match_parent"
            android:layout_height="?attr/actionBarSize"
            android:background="?attr/colorPrimary"
            app:popupTheme="@style/AppTheme.PopupOverlay" />

    </android.support.design.widget.AppBarLayout>

    <include layout="@layout/content_main" />


</android.support.design.widget.CoordinatorLayout>
<?xml version="1.0" encoding="utf-8"?>
<RelativeLayout xmlns:android="http://schemas.android.com/apk/res/android"
    xmlns:app="http://schemas.android.com/apk/res-auto"
    xmlns:tools="http://schemas.android.com/tools"
    android:id="@+id/content_main"
    android:layout_width="match_parent"
    android:layout_height="match_parent"
    android:paddingBottom="@dimen/activity_vertical_margin"
    android:paddingLeft="@dimen/activity_horizontal_margin"
    android:paddingRight="@dimen/activity_horizontal_margin"
    android:paddingTop="@dimen/activity_vertical_margin"
    app:layout_behavior="@string/appbar_scrolling_view_behavior"
    tools:context=".MainActivity"
    tools:showIn="@layout/activity_main">

        <android.support.design.widget.BottomNavigationView
            xmlns:android="http://schemas.android.com/apk/res/android"
            xmlns:app="http://schemas.android.com/apk/res-auto"
            android:id="@+id/bottom_navigation"
            android:layout_width="match_parent"
            android:layout_height="56dp"
            android:layout_gravity="bottom"
            android:background="@android:color/white"
            app:elevation="8dp"
            app:menu="@menu/item" />

        <FrameLayout
            android:id="@+id/fragment_frame"
            android:layout_width="200dp"
            android:layout_height="200dp"
            android:layout_marginTop="107dp"
            android:layout_below="@+id/bottom_navigation"
            android:layout_centerHorizontal="true" />


</RelativeLayout>
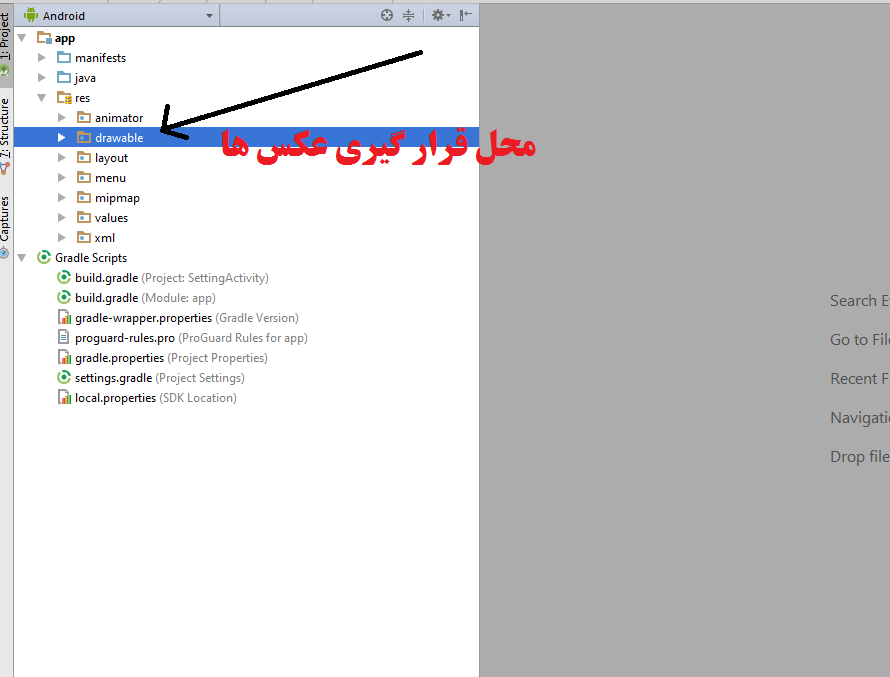
عکس های زیر را از اینجا دانلود کنید و آن را در پوشه drawable خود قرار دهید.
به منظور افزودن آیتم های BottomNavigationView لازم است فایلی در دایرکتوری menu از زیر پوشه های resource ایجاد کرده و نام آن را item.xml می گذاریم .
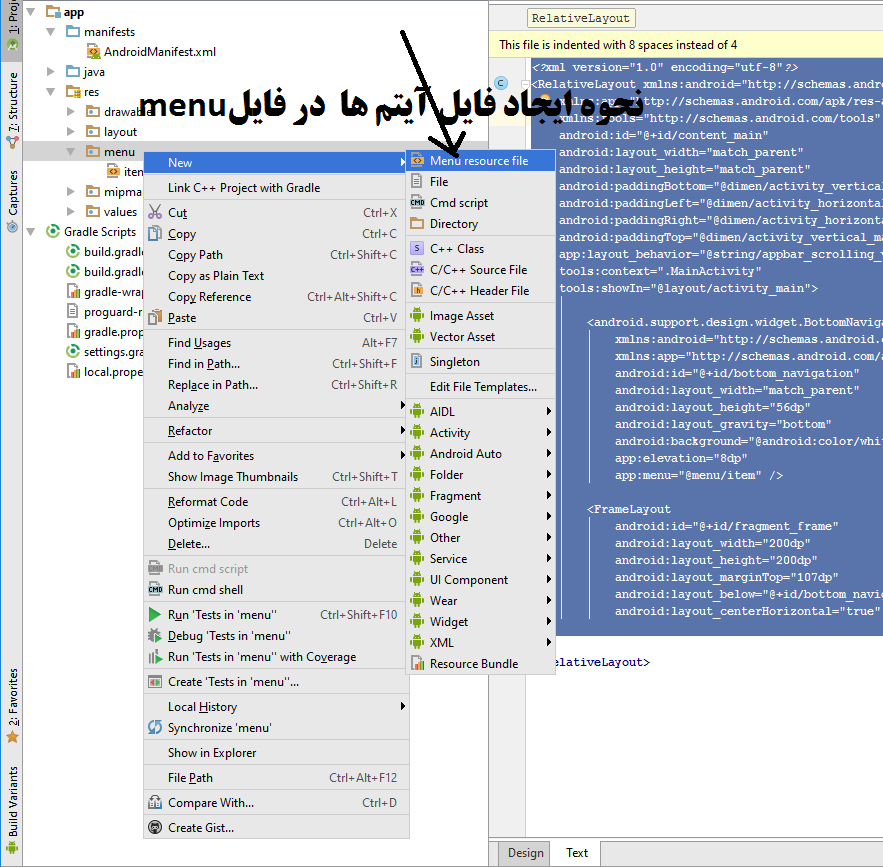
و کدهای زیر را به ان می افزاییم:
<menu xmlns:android="http://schemas.android.com/apk/res/android">

<item android:id="@+id/action_home"
        android:title="@string/text_home"
        android:icon="@drawable/home" />

    <item android:id="@+id/action_profile"
        android:title="@string/text_profile"
        android:icon="@drawable/profile" />

    <item android:id="@+id/action_settings"
        android:title="@string/text_settings"
        android:icon="@drawable/setting" />
</menu>
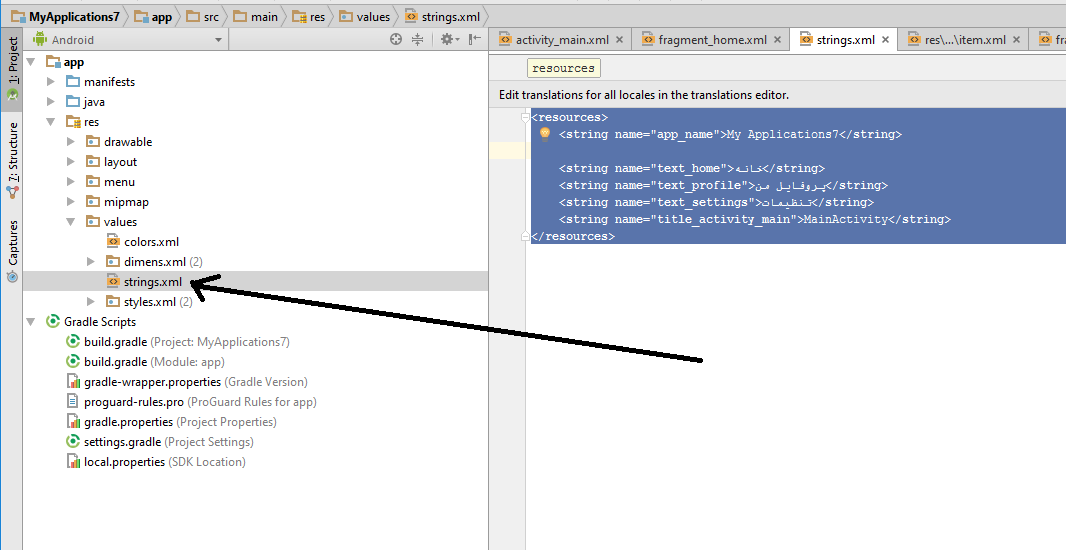
مطابق عکس زیر فایل string از زیر پوشهvalue واز فایل های اصلی دایرکتوری resource پروژه را باز کرده و کدهای زیر را در آن قرار می دهیم:
<resources>
    <string name="app_name">My Applications7</string>

    <string name="text_home">خانه</string>
    <string name="text_profile">پروفایل من</string>
    <string name="text_settings">تنظیمات</string>
    <string name="title_activity_main">MainActivity</string>
</resources>
به منظور ارجاع کاربران به صفحات دیگر زمانی کاربران بر روی هریک از آیتم ها کلیک می کنند لازم است که سه لایوت فرگمنت در قسمت لایوت (layout) ایجاد کنیم و نام هریک را به ترتیبی که در ذیل آماده است قرار دهیم:
fragment_home.xml
<?xml version="1.0" encoding="utf-8"?>
<LinearLayout xmlns:android="http://schemas.android.com/apk/res/android"
    android:orientation="vertical"
    android:background="@drawable/home"
    android:layout_width="match_parent"
    android:layout_height="match_parent">
    <TextView
        android:layout_width="match_parent"
        android:layout_height="match_parent"
        android:text="@string/text_home"/>

</LinearLayout>
fragment_profile.xml
<?xml version="1.0" encoding="utf-8"?>
<LinearLayout xmlns:android="http://schemas.android.com/apk/res/android"
    android:orientation="vertical"
    android:background="@drawable/profile"
    android:layout_width="match_parent"
    android:layout_height="match_parent">
    <TextView
        android:layout_width="match_parent"
        android:layout_height="match_parent"
        android:text="@string/text_profile"/>

</LinearLayout>
fragment_setting.xml
<?xml version="1.0" encoding="utf-8"?>
<LinearLayout xmlns:android="http://schemas.android.com/apk/res/android"
    android:orientation="vertical"
    android:background="@drawable/setting"
    android:layout_width="match_parent"
    android:layout_height="match_parent">
    <TextView
        android:layout_width="match_parent"
        android:layout_height="match_parent"
        android:text="@string/text_settings"/>


</LinearLayout>
حال نوبت به ایجاد کلاس های فرگمنت هاست از این رو بر روی پکیج اصلی پروژه کلیک راست کرده و از آپشن های ظاهر شده در گزینه New آپشن java class را می زنیم و به ترتیب نام و سورس های زیر را به پروژه خود اضافه می کنیم:
HomeFragment.java
package ir.psrd.example.BottomNavigationView;

/**
 * Created by h.ghanbari on 15/01/2018.
 */

import android.app.Fragment;
import android.os.Bundle;
import android.support.annotation.Nullable;
import android.view.LayoutInflater;
import android.view.View;
import android.view.ViewGroup;

public class HomeFragment extends Fragment {

    public static HomeFragment newInstance() {

        return new HomeFragment();
    }

    @Nullable
    @Override
    public View onCreateView(LayoutInflater inflater, @Nullable ViewGroup container, Bundle savedInstanceState) {
        return inflater.inflate(R.layout.fragment_home, container, false);
    }
}
ProfileFragment.java
package ir.psrd.example.BottomNavigationView;

/**
 * Created by h.ghanbari on 15/01/2018.
 */

import android.app.Fragment;
import android.os.Bundle;
import android.support.annotation.Nullable;
import android.view.LayoutInflater;
import android.view.View;
import android.view.ViewGroup;

public class ProfileFragment extends Fragment {

    public static ProfileFragment newInstance() {

        return new ProfileFragment();
    }

    @Nullable
    @Override
    public View onCreateView(LayoutInflater inflater, @Nullable ViewGroup container, Bundle savedInstanceState) {
        return inflater.inflate(R.layout.fragment_profile, container, false);
    }
}
SettingsFragment.java
package ir.psrd.example.BottomNavigationView;

/**
 * Created by h.ghanbari on 15/01/2018.
 */

import android.app.Fragment;
import android.os.Bundle;
import android.support.annotation.Nullable;
import android.view.LayoutInflater;
import android.view.View;
import android.view.ViewGroup;

public class SettingsFragment extends Fragment {

    public static SettingsFragment newInstance() {

        return new SettingsFragment();
    }

    @Nullable
    @Override
    public View onCreateView(LayoutInflater inflater, @Nullable ViewGroup container, Bundle savedInstanceState) {
        return inflater.inflate(R.layout.fragment_setting, container, false);
    }
}
حال کلاس اصلی پروژه یعنی Mainactivity را باز کرده و کدهای زیر را در ان قرار می دهیم:
package ir.psrd.example.BottomNavigationView;

import android.app.FragmentTransaction;
import android.os.Bundle;
import android.support.annotation.NonNull;
import android.support.design.widget.BottomNavigationView;
import android.support.v7.app.AppCompatActivity;
import android.support.v7.widget.Toolbar;
import android.view.MenuItem;

public class MainActivity extends AppCompatActivity {

    private BottomNavigationView mBottomNavigationView;

    @Override
    protected void onCreate(Bundle savedInstanceState) {
        super.onCreate(savedInstanceState);
        setContentView(R.layout.activity_main);
        Toolbar toolbar = (Toolbar) findViewById(R.id.toolbar);
        setSupportActionBar(toolbar);

        setupBottomNavigation();

        if (savedInstanceState == null) {

            loadHomeFragment();
        }

    }

    private void setupBottomNavigation() {

        mBottomNavigationView = (BottomNavigationView) findViewById(R.id.bottom_navigation);

        mBottomNavigationView.setOnNavigationItemSelectedListener(new BottomNavigationView.OnNavigationItemSelectedListener() {
            @Override
            public boolean onNavigationItemSelected(@NonNull MenuItem item) {

                switch (item.getItemId()) {
                    case R.id.action_home:
                        loadHomeFragment();
                        return true;
                    case R.id.action_profile:
                        loadProfileFragment();
                        return true;
                    case R.id.action_settings:
                        loadSettingsFragment();
                        return true;
                }
                return false;
            }
        });
    }

    private void loadHomeFragment() {

        HomeFragment fragment = HomeFragment.newInstance();
        FragmentTransaction ft = getFragmentManager().beginTransaction();
        ft.replace(R.id.fragment_frame, fragment);
        ft.commit();
    }

    private void loadProfileFragment() {

        ProfileFragment fragment = ProfileFragment.newInstance();
        FragmentTransaction ft = getFragmentManager().beginTransaction();
        ft.replace(R.id.fragment_frame, fragment);
        ft.commit();
    }

    private void loadSettingsFragment() {

        SettingsFragment fragment = SettingsFragment.newInstance();
        FragmentTransaction ft = getFragmentManager().beginTransaction();
        ft.replace(R.id.fragment_frame, fragment);
        ft.commit();
    }
}
حال پروژه را اجرا کرده و از آن در آموزش هر چه بیشتر خود استفاده کنید. اگر مشکلی در اجرای کدها وجود دارد یا سوال مشخصی از نویسنده سایت دارید سوالات خود را در قسمت دیدگاه ها بیان کنید.
کپی برداری از محتوای سایت psrd، ممنوع بوده و پیگرد قانونی دارد. (تنها استفاده شخصی کاربران ، مجاز است) (کپی برداری توسط سایر وب سایت ها غیرقانونی بوده و در صورت رویت به ستادسازماندهی اطلاع داده خواهد شد.
0 دیدگاه